Bells eating counters
A bell is a run made of bouncers that keep getting bigger (the wiki's definition). The word is also used for a part of the tape: the striped word (10)^p that the bouncer runs over. The whole run is called a bell because each round is a bouncer over that word, bigger than the last.
In W5-3, each trip of the head adds 1 to a binary counter. When a round ends, the bell eats the counter's lowest digits and grows. To prove W5-3 never halts, we look only at the moments just before each eat, called E(p, N), and show that five rules always give the next one.
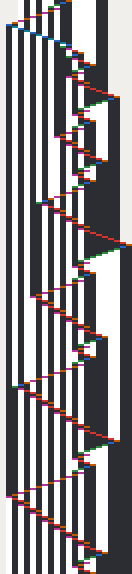
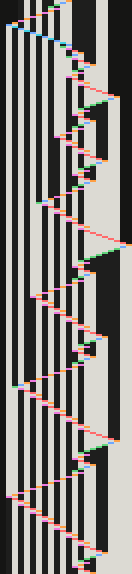
every step
(165 → 451)
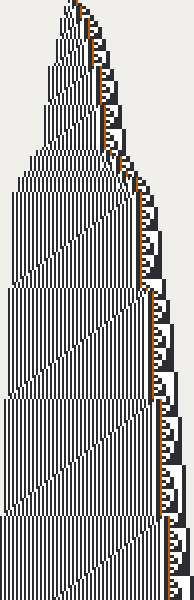
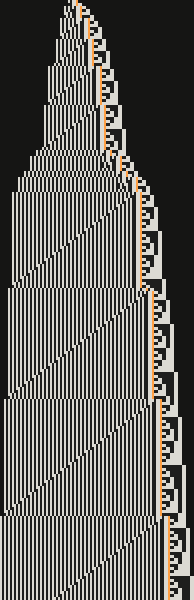
(steps 7 → 20,651)
Left: one bouncer. Each row is one step of W5-3. The first trip is an eat: it runs to the blank left end, cell −5. Every later trip runs left until it meets the defect (one cell that breaks the stripes), changes it, and comes back to the counter on the right.
The turning point moves left with every trip (cell 5, 3, 0, −1, −4, −5), so the zig-zag widens. That widening zig-zag is the bouncer.
Right: many rounds. One row each time the head is back at the counter, so the head (orange) is always at the counter's left end. The stripes are the bell. Each slanted line is the defect walking left: one line, one round.
When the defect is gone, the next trip is an eat: the bell grows at both ends, so its left edge steps left and the head steps right. Rounds mostly get longer; the two short ones near step 3,000 are M4 rounds (section 4).
Rendered from real runs by tools/diagram.py, in the widgets' colours; learn/img/make_04.py remakes them.
1Read the tape at an eat
W5-3 at step 165. Left is the bell, 2 pairs of 10 (cells −2 to 1). Then 0 1 1, and the head: B reads the 0 after them (cell 5). Right is the counter: digit 0 is 00, digit 1 is 11, lowest digit first.
The counter reads 0, 0, 1 from the head outward, so N = 100 in binary = 4. We call this tape E(2,4): p = 2 pairs in the bell, counter N = 4. Every eat configuration has the same shape:
E(p, N) = 0^inf (10)^p 0 1 1 B> 0 C(N)
C(N) is the counter: N's binary digits, lowest first, each written twice (00 or 11). B> means "state B reads the next cell to the right".
2One round: count, count, …, count
One row each time the head is back at the counter: B reads the 0 just right of 0 1 1. These moments are the count configurations. Here they go from E(2,4) at step 165 to E(5,7) at step 451, the round in the left picture above. Row 2 is right after the eat (section 3). Rows 3 to 8 are counts, and each one adds 1 to N.
Step through it and watch the bracket marked defect:
- an extra
1becomes an extra0in the same place (rows 3 → 4 and 5 → 6); - an extra
0becomes an extra1two pairs further left (rows 4 → 5 and 6 → 7); - at row 8 the defect has walked off the left end. The bell is clean again,
(10)^5, and N = 7: that is E(5,7).
Inside two counts, every step (steps 225 to 301)
E runs left over the 10 pairs until it meets the defect, and changes it. Then A runs back right into the counter and adds 1 there (the carry of module 3), and the head ends at B again. The first trip takes 30 steps, the second 46.
3The eat, every step (steps 165 to 197)
With no defect, E's sweep does not stop: it runs off the left end of the bell into the blank. There B and C write 1s, and then C and F sweep right over the whole bell. C writes 1 on each 0 and F writes 0 on each 1, so the stripes slide over by one cell: watch rows 177 to 187. The bell now starts 3 cells further left (cell −5 instead of −2).
Then A runs on into the counter and bites its low digits: 00 00 11 (N = 4) becomes 11 (N = 1), and the head ends 4 cells further right (cell 9 instead of 5). The bell has grown into the eaten cells too and ends with 1 1 1. The next count turns that into a single extra 1: the new defect, at the counter end, ready to walk left.
Why eats are where proofs get hard: W5-3's only undefined transition is F reading 0 (the red cell in the table), and F runs only in this sweep. On a clean bell every cell F reads is a 1, so the machine cannot halt here. The proof has to show that every future eat is like this one.
4Eat to eat: from E(p, N) to E(p′, N′)
Now skip the counts: one row per eat configuration, from the blank tape. The strip shows 14 cells on each side of the head: the end of the bell, 0 1 1, and the counter. Each line of the history starts with its E(p, N). Watch the two numbers.
Which rule comes next depends only on N's lowest binary digits: the digits right of the head. These are rules M1–M5 of W5-3's write-up, in plain words.
| N is … | next p | next N | seen in the run |
|---|---|---|---|
| odd (M1) | p + 2, +1 if p is odd | (N + 1)/2 + p + 3 | E(5,7) → E(8,12) |
| a multiple of 4 (M2) | p + 3, +1 if p is odd | N/4 + p + 4 | E(2,4) → E(5,7) |
| 8m + 2 (M3) | p + 4, +1 if p is odd | m + p + 6 | E(30,34) → E(34,40) |
| 16m + 6 (M4) | p + 7 | m + 5 | E(14,22) → E(21,6) |
| 16k + 14 (M5) | p + 7 + t | m + 2^t + t + 1, m and t below | E(68,110) → E(76,7) |
"+1 if p is odd" means p′ gets one more when p is odd. In M5, write N + 2 = (2m + 1)·2^(t+3) with t ≥ 1. For N = 110: N + 2 = 112 = 7·16, so m = 3, t = 1 and N′ = 3 + 2 + 1 + 1 = 7. (The write-up also asks for p + 7 ≥ 2^t; that always holds while N ≤ 2p, module 5's invariant.)
Why N stays small. The eat leaves about half or a quarter of N: (N + 1)/2 for odd N, N/4 for N a multiple of 4. Then each count adds 1, and a round has about as many counts as the bell has pairs (drill 2). From E(2,4): the eat leaves 1, then 6 counts give N = 7.
Why M4 and M5 drop N so far. They eat, count once, and eat again. From E(14,22): eat (steps 2,725 → 2,822), one count (→ 2,846), eat (→ 2,953). The two eats bite the four low digits of 22 = 10110 and leave m + 1 = 2. Then two defects cancel each other after just 4 counts (N = 2, 3, 4, 5, 6, steps 2,953 → 3,097), instead of one defect walking across the whole bell. So N′ = m + 5 = 6.
Pick p and N (with N ≤ 2p, the range the real run stays in; module 5 shows why). The page writes E(p, N) on a fresh tape, runs W5-3 until the next eat configuration, and compares it with the table.
5The family
Eight more of our kills are in the spreadsheet's class "Bell eats counter"; here are four of them. Each has its own bell and its own counter. In each proof, rules take one eat configuration to the next, and an invariant (module 5) shows that no eat ever lands at a bad moment.
W4-2 and W5-1: one table, mirrored


How to read these: bbchallenge.org's Blaze view squeezes the first 106 steps into 500 rows, time going down; orange is a 1, white a 0. The wide striped part is the bell. The narrow, ragged edge is the counter it eats: on the left in W4-2, on the right in W5-1. Each horizontal band is one round of bounces, from one eat to the next, and the bell's outer edge steps out once per band. The early, short rounds are squeezed into the top rows. (Rendered by tools/diagram.py.)
W4-2 1RB1LF_0RC0RB_0LD1LA_1LC0LE_0LA---_1LA1LF is a machine already proved in busycoq (the Coq library that bbchallenge proofs are written in), file BECv5.v, Module TM1, with one transition changed (F1). Its proof: from step 32 on, the counter stays between 1 and about 2.5 times the length of the last round.
W5-1 1RB1LD_1LC1RA_0LD0LC_0RE1RB_1RD0RF_0RB--- is W4-2 with one transition changed (F1), mirrored left to right, with the states permuted. Its start state A plays the role of W4-2's state F. That is why its picture looks like W4-2's flipped left to right.
W5-4: a counter that counts down
W5-4 1RB0RC_1LC1RB_0RE1LD_0LC1LA_1RF1RA_---0RB. One row per round: the head is back at the wall 00. Each round the bell (q pairs) loses 2 pairs and the counter v loses 1. At 0 the counter refills (here to 6) and grows by one bit, and that round costs 3 pairs. Between rows 7 and 8 the bell is used up: the wall bites the counter, and everything left of it becomes the new bell (q = 15).
The counter's bits sit on every third cell, counted from its right end, and a set bit is a 0 cell. The labels give v, decoded from those cells as in W5-4's write-up. The widget stops at row 14. The next bite is a nested one (the write-up's "Nesting"), and its rows do not follow this pattern.
#2 against its template


Same reading as above: the first 106 steps, Blaze view, orange = 1, white = 0, time going down. Look at the overall shape, not the details.
#2 1RB0RF_1LC0RE_0LC0LD_1RD1LB_0RF1RA_0RB---, our first accepted kill (PR #14), is busycoq's file SOMDCv6.v, Module TM7, with one transition changed: A1 is 0RF instead of 0RC. From far away they look the same. The explorer preset plays both from the same tape, step by step, and marks where they split.
The other four: #30, #7 and W4-1 share one table (mirrored or with the states permuted) and start in different states; W5-5 is the one that halts.
Predict, then reveal
Read the tape in each box, then guess. Your guess stays in this browser. Reveal plays the real run to the answer.
- W5-3 1RB1RA_1LC1LE_1RF1LD_1RE0LD_0LB0RA_---0RC, the machine on this page: our 24th kill, a 530-line Coq proof that passes our checks (claimed, not yet submitted). Open it in the explorer.
- W4-2, W5-1, W5-4, #30, #7, W4-1 (never halt) and W5-5 (halts): killed and claimed, not yet submitted.
- #2: accepted upstream (PR #14, merged 2026-10-10).
Recap
- Each count adds 1 to the counter and flips the defect; every second count moves it two pairs left. When the defect is gone, the next trip is an eat that shifts the bell and bites the counter.
- The eat configurations E(p, N) are the checkpoints: N's lowest binary digits pick one of five rules, which give the next E(p′, N′).
- p always grows and N stays small; proving that N ≤ 2p holds forever is the invariant of module 5.